Anchor Kards in your level
Anchor a Kard to a place or an object in your project, then see it as a badge in the level viewport. This page covers pinning a Kard to a spot, dragging a Kard onto an actor, and finding and repositioning badges.
This is what makes Kard spatial: a task or note stops being a row in a list and becomes a marker you can fly to in 3D.
Before you begin
Section titled “Before you begin”- A level open in the editor — spatial anchors resolve against a world.
- At least one Kard to pin. See Create & edit Kards.
For the Kard, board, and view vocabulary used here, see Concepts.
What an anchor is
Section titled “What an anchor is”Each Kard has one spatial anchor — the single spot that places its badge in the level. A Kard can also carry any number of non-anchor references — see Contexts & references — but only the anchor drives a viewport badge.
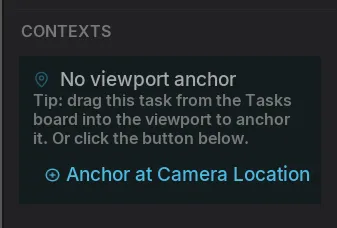
Anchor a Kard to a spot in your level
Section titled “Anchor a Kard to a spot in your level”Pin a Kard to the exact point your camera is looking at — no actor required.
- Open the Kard in the detail view.
- Find the Contexts panel in the right rail.
- With no anchor set yet, click Anchor at Camera Location.
Kard tries to place the Kard in a good location in front of the camera
You can also anchor straight from the viewport without opening a Kard first:
- Right-click in the viewport → Kard → Tasks → Create Task Here (or Notes → Create Note Here, or Create Page Here). Kard creates a new Kard already pinned to the cursor’s world position.
Drag a Kard onto an actor
Section titled “Drag a Kard onto an actor”Drag an existing Kard from a list, board, or the sidebar directly into the viewport to pin it.
- Press and drag a Kard row toward the level viewport.
- Drop it over the spot or actor you want.
- In the dialog that appears, choose:
- Drop into Level — anchor at the point under your cursor.
- Attach to Actor — anchor to the actor you dropped on; the badge tracks that actor.
- Cancel — leave the Kard unpinned.
The badge appears as soon as you confirm.
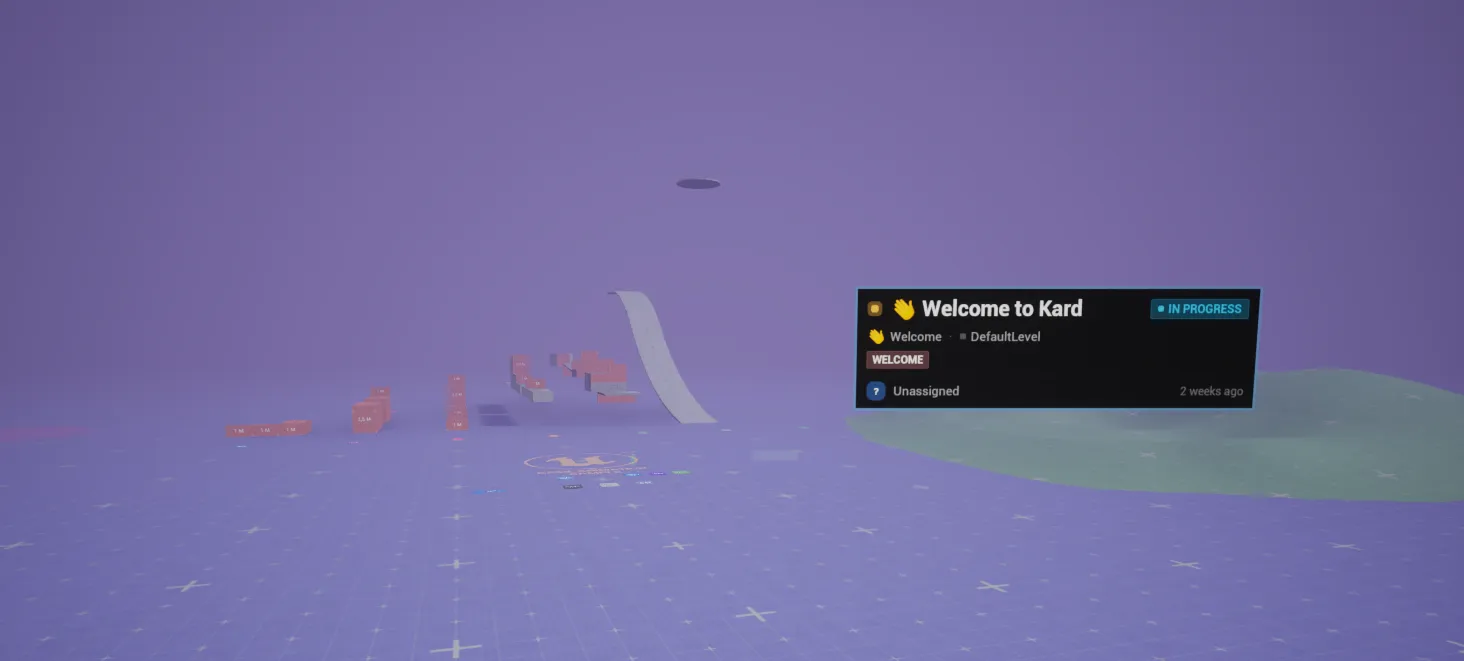
See spatial Kards in the viewport
Section titled “See spatial Kards in the viewport”Pinned Kards show as badges floating at their anchor point. A task badge mirrors its dashboard Kard — priority dot, title, status pill, folder, tags, and assignee — so you can read a task without opening it.
Badges face the camera and stay readable at any angle. Only pinned Kards spawn a badge; unpinned Kards cost nothing in the viewport.
Highlight the actor a Kard points to (optional)
Section titled “Highlight the actor a Kard points to (optional)”When the optional rendering integration is enabled, hovering a badge — or hovering the matching Kard row in a list — draws a glowing outline around the actor the Kard references. This makes it obvious which object a Kard is about.
Open a pinned Kard from the viewport
Section titled “Open a pinned Kard from the viewport”- Click a badge to open its Kard.
- Right-click a badge → Open Task / Open Note to open it from the menu.
Kard badges don’t appear in the World Outliner and aren’t selected by the standard move tool — clicking one opens the Kard instead of selecting it.
Reposition a pinned Kard
Section titled “Reposition a pinned Kard”You cannot select a Kard like any other viewport actor (clicking it opens the Kard window). So Kard features a Custom Reposition Tool. Reposition mode gives you a custom, screen-aligned translation gizmo right in the viewport.
Enter it any of three ways:
- Ctrl+LMB (or Alt+LMB) on a badge.
- Right-click a badge → Reposition (Move).
- In the Kard’s Contexts panel, click Reposition on the anchor row.
Then:
- Drag the gizmo to the new spot. The badge follows live, with a dashed line back to where it started.
- Press Enter to confirm, or Esc to cancel and snap back.
The new position saves to the Kard, and a reposition is a single Ctrl+Z step if you change your mind.
Show or hide badges with the viewport filter
Section titled “Show or hide badges with the viewport filter”Control which badges appear without changing your Kard list. The viewport filter is independent of the dashboard/list filter — hiding badges never touches what’s in your lists, and filtering a list never hides a badge.
- Open the Kard dropdown in the level-editor toolbar.
- Choose Viewport Filters.
- Toggle what you see:
- Show Tasks / Show Pages / Show Notes — by Kard type.
- Mine only — only badges assigned to you.
- Category toggles — hide whole categories.
- Choose Clear all viewport filters to show every badge again.
For filtering the Kard lists themselves — search, saved views, status, tags — see Find your work.
Related Reads
Section titled “Related Reads”- Create & edit Kards — fields, descriptions, attachments, and comments.
- Contexts & references — link Kards to actors, Blueprints, levels, and assets.
- Relate & link Kards — typed relations and wikilinks.
- Capture work automatically — turn code comments and editor messages into Kards.